
Qall
Product Walkthrough

See every flow. Step by step.

Visual walkthroughs of the essential flows your team runs every day — from onboarding a client to distributing leads and importing a book of business.

For Advisors

Advisor flows

The daily rhythms your team moves through — onboarding clients, opening profiles, and submitting compliance.

Add a Client

Capture a new client, policies and contacts in seconds — with validation and audit trail built in.

  1. STEP 01

    Start a new lead

    Jump in from the 'Add Lead' sidebar menu. The form is designed for speed, with only the essential fields required to get started.
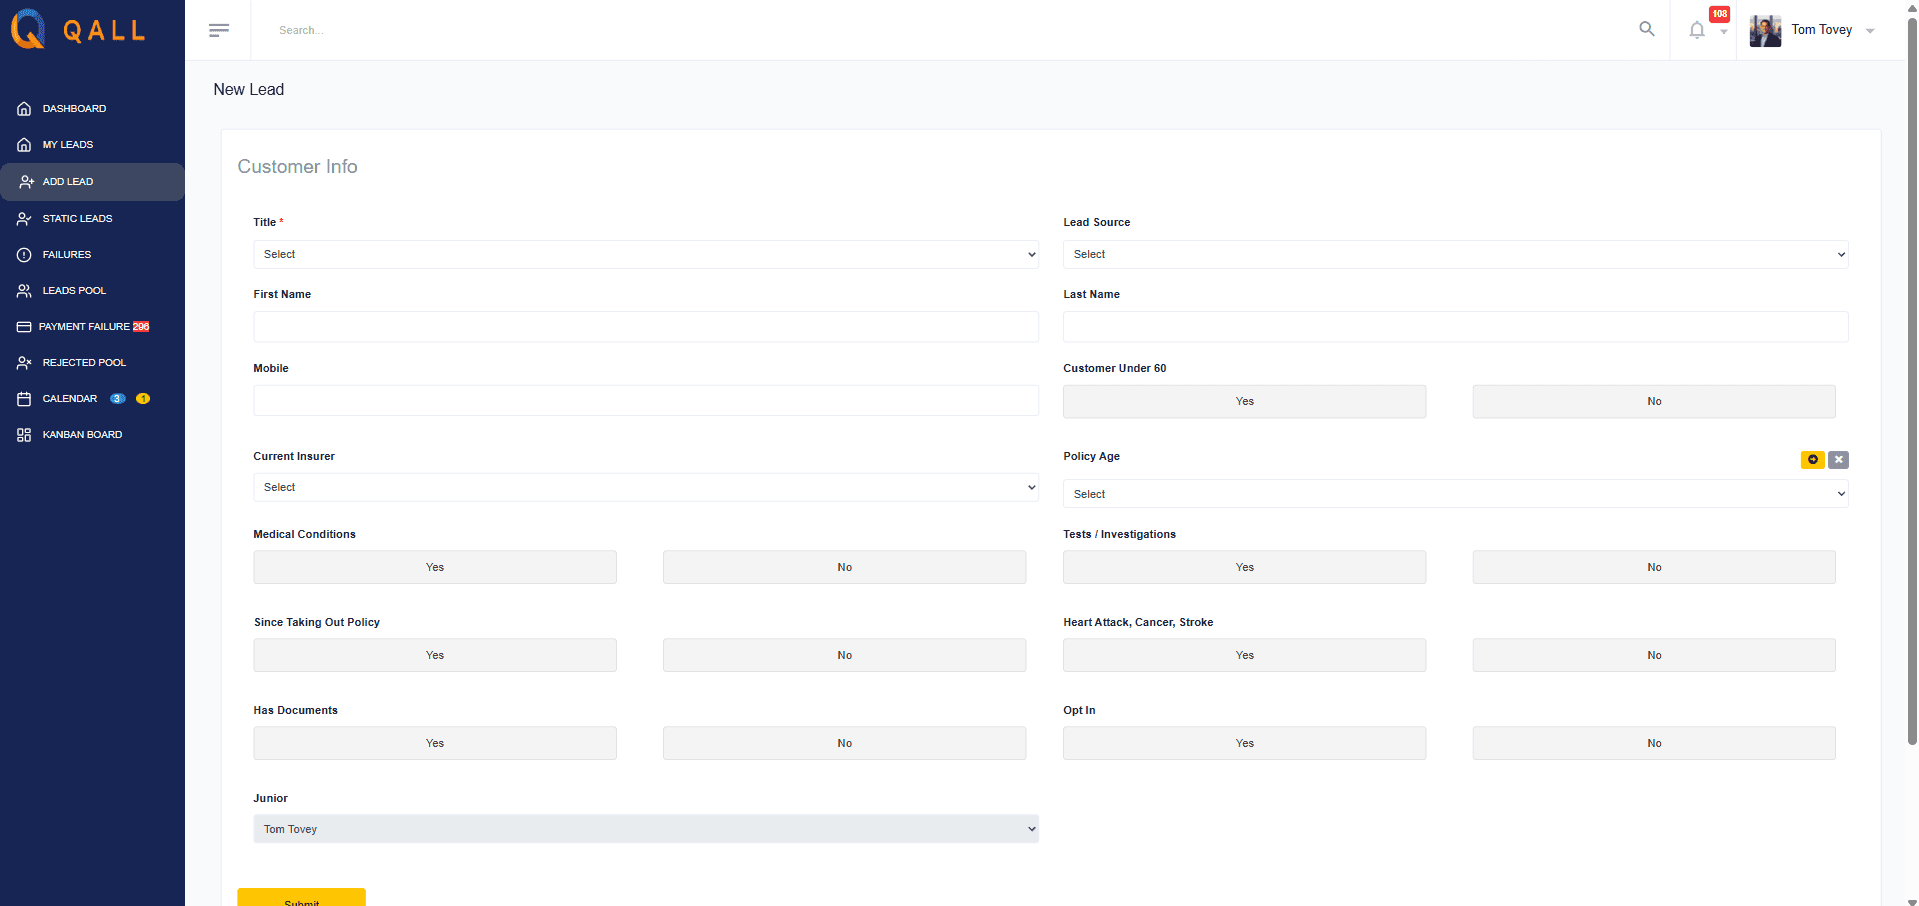
    Add a Client — step 01: Start a new lead
  2. STEP 02

    Enter core details

    Name, contact info, and policy details — Qall validates as you type so bad data never makes it into the record.
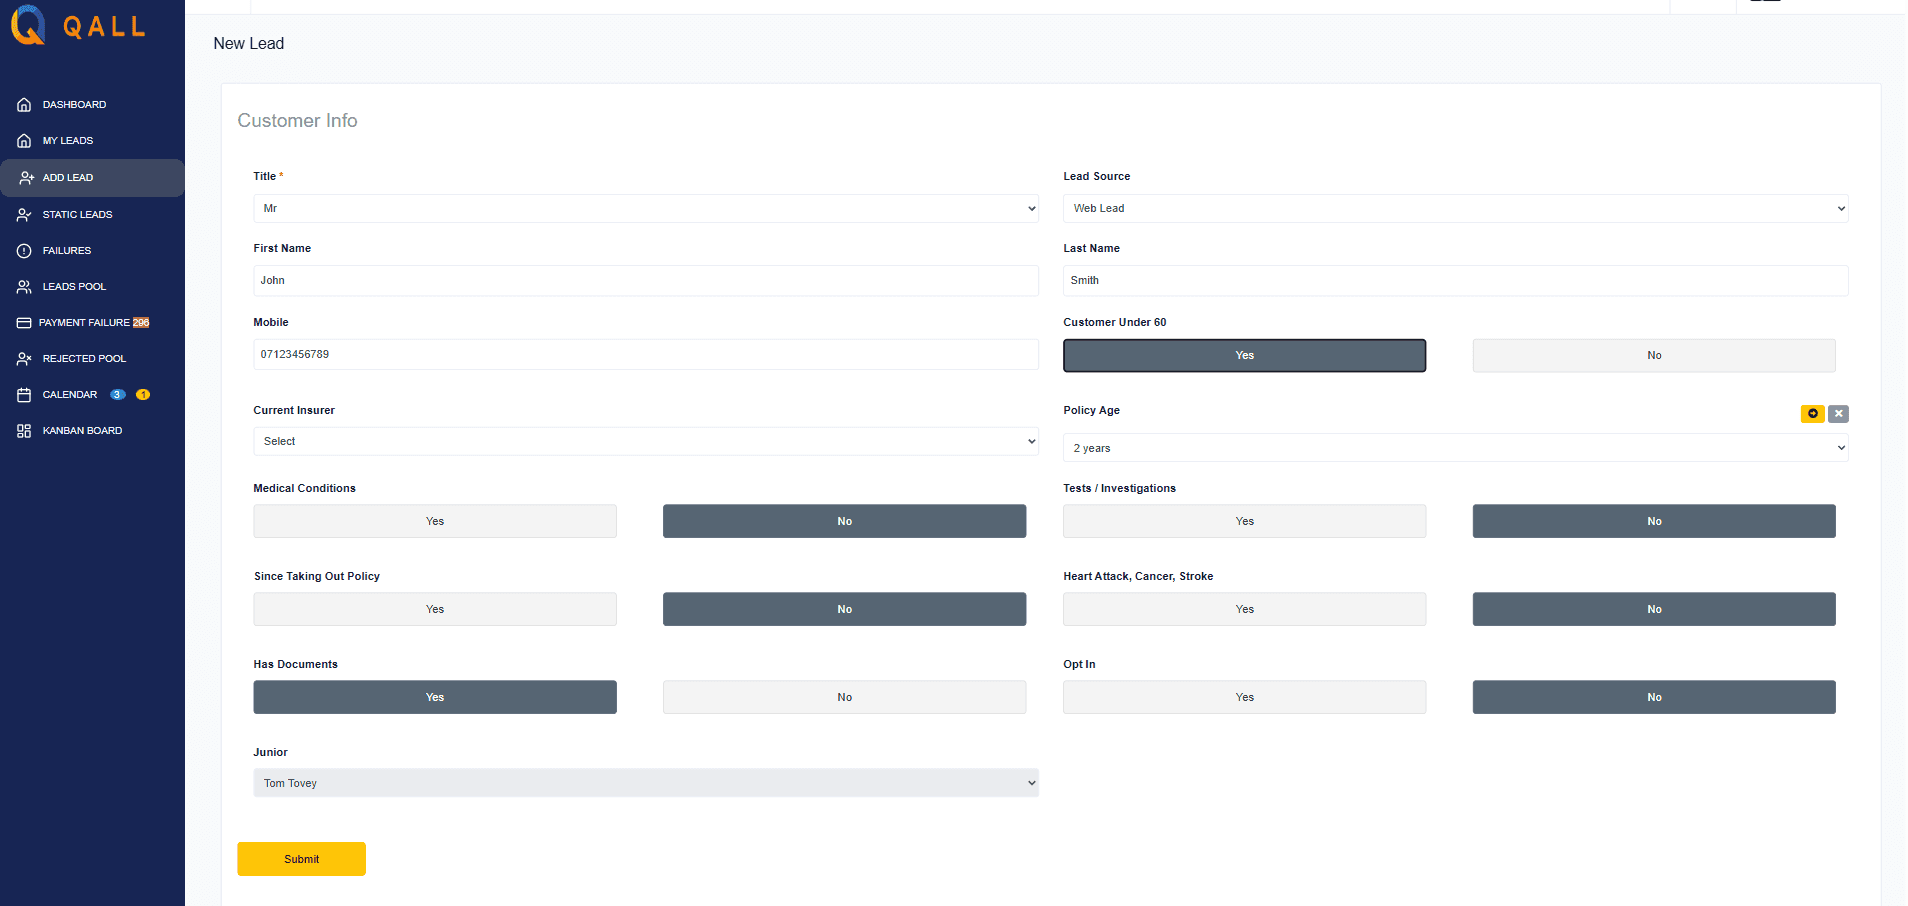
    Add a Client — step 02: Enter core details
  3. STEP 03

    Attach supporting documents

    Drop in policy docs, ID and correspondence directly into the client's profile for instant recall.
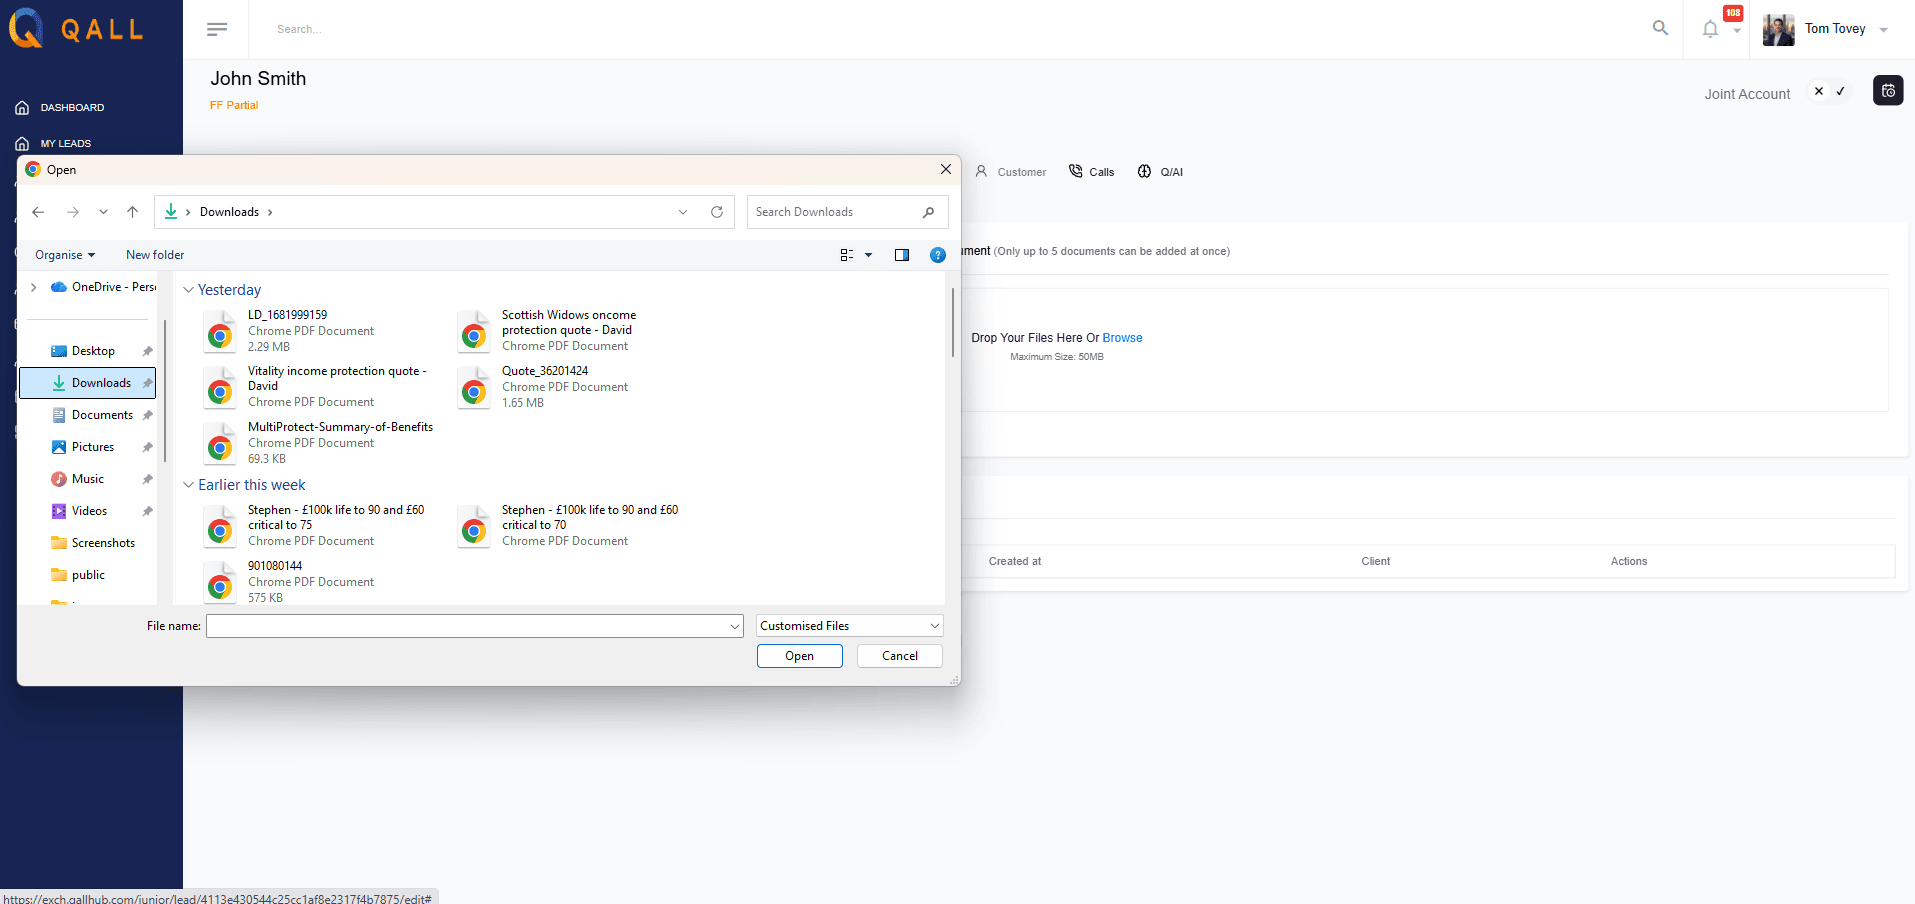
    Add a Client — step 03: Attach supporting documents

View a Client Profile

Every policy, interaction and commission for a client — surfaced in a single unified view.

  1. STEP 01

    Find the client

    Search by name, policy number or reference, or open directly from a dashboard card or task.

    View a Client Profile — step 01: Find the client

    CRM screenshot coming soon

  2. STEP 02

    Scan the summary panel

    Key metrics sit at the top — active policies, renewals due, last interaction, commission to date.

    View a Client Profile — step 02: Scan the summary panel

    CRM screenshot coming soon

  3. STEP 03

    Drill into history

    Tabs for policies, interactions, documents and compliance — full history in chronological view.

    View a Client Profile — step 03: Drill into history

    CRM screenshot coming soon

  4. STEP 04

    Trigger the next action

    Start a quote, log an interaction, or raise a compliance request without leaving the profile.

    View a Client Profile — step 04: Trigger the next action

    CRM screenshot coming soon

Submit a Compliance Form

Complete and file required paperwork without leaving the client record — admins review it in real time.

  1. STEP 01

    Open the compliance tab

    Compliance lives alongside the client record, so you never lose context when filing paperwork.

    Submit a Compliance Form — step 01: Open the compliance tab

    CRM screenshot coming soon

  2. STEP 02

    Fill the pre-populated form

    Client data flows through automatically. You only fill what's actually new.

    Submit a Compliance Form — step 02: Fill the pre-populated form

    CRM screenshot coming soon

  3. STEP 03

    Upload supporting evidence

    Drag in screenshots, signed docs and notes. Everything stays attached to the submission.

    Submit a Compliance Form — step 03: Upload supporting evidence

    CRM screenshot coming soon

  4. STEP 04

    Submit for review

    Submission hits the admin queue instantly and surfaces in the advisor's activity feed.

    Submit a Compliance Form — step 04: Submit for review

    CRM screenshot coming soon

For Admins

Admin flows

Control-room operations — keeping compliance tight, distribution sharp, and data moving through the platform.

Approve Compliance

Review, approve or return compliance submissions from the team — with a complete audit trail.

  1. STEP 01

    Open the compliance queue

    Every pending submission in one sortable, filterable view. Older items surface first by default.

    Approve Compliance — step 01: Open the compliance queue

    CRM screenshot coming soon

  2. STEP 02

    Review the submission

    Form content, attached evidence, and advisor notes side by side. No switching tabs to piece it together.

    Approve Compliance — step 02: Review the submission

    CRM screenshot coming soon

  3. STEP 03

    Approve or request changes

    One click approves. Requesting changes returns the submission to the advisor with your notes attached.

    Approve Compliance — step 03: Approve or request changes

    CRM screenshot coming soon

  4. STEP 04

    Status flows back in real time

    The advisor sees the outcome the moment you commit it — no email, no waiting, no chasing.

    Approve Compliance — step 04: Status flows back in real time

    CRM screenshot coming soon

Distribute Leads

Push incoming leads to the right advisors using automated or manual routing — and track pick-up in real time.

  1. STEP 01

    Monitor the incoming board

    Every lead lands in one queue — sourced from forms, imports, or partner feeds — with context attached.

    Distribute Leads — step 01: Monitor the incoming board

    CRM screenshot coming soon

  2. STEP 02

    Apply routing rules

    Route by region, product, capacity or seniority. Rules run automatically or as a one-click override.

    Distribute Leads — step 02: Apply routing rules

    CRM screenshot coming soon

  3. STEP 03

    Assign to advisors

    Bulk-assign a whole cohort or route individually. Round-robin, capacity-aware, or manual — your call.

    Distribute Leads — step 03: Assign to advisors

    CRM screenshot coming soon

  4. STEP 04

    Track pick-up and conversion

    See who responded, how fast, and what converted — feeding back into the rules you set next.

    Distribute Leads — step 04: Track pick-up and conversion

    CRM screenshot coming soon

Import Data

Bring existing clients, policies and commission history into Qall — no manual re-entry, full validation.

  1. STEP 01

    Upload a source file

    CSV from your previous CRM or broker statement — drag in and Qall parses the columns.

    Import Data — step 01: Upload a source file

    CRM screenshot coming soon

  2. STEP 02

    Map fields to Qall

    Auto-mapping proposes the layout. You confirm, override where needed, and the mapping is saved for reuse.

    Import Data — step 02: Map fields to Qall

    CRM screenshot coming soon

  3. STEP 03

    Preview and fix issues

    Row-level validation catches duplicates, missing fields and format mismatches before anything is committed.

    Import Data — step 03: Preview and fix issues

    CRM screenshot coming soon

  4. STEP 04

    Commit the import

    Added, merged and skipped rows are logged. You get a full import report and the ability to roll back.

    Import Data — step 04: Commit the import

    CRM screenshot coming soon

Ready to see it live?

Book a demo and walk through any of these flows with a Qall specialist on the real platform.